Super Adobe- Earth Bag Building with Permastructure
Permastructure
Sept 21st-28th 2013

Its taken me a bit of time to do this write up! So much information was crammed into my brain in that week and I have had to make up for the lost time with teaching, workshops and designs!
Earlier this year I started to think more about the house I would like to build one day... through my journey of Permaculture I have seen many different ways of natural building, but none has stood out to me as much as SuperAdobe- it seems to compliment my left brain mentality when it comes to building.
You can look up some really amazing stuff on Earth Bag building here: http://www.earthbagbuilding.com/
http://calearth.org/
I'm not going to explain the ins and outs- what I will say is that earth bag building is a great way to use resources on site, if you have sand or clay available and appropriate things to make a good mix. These structures are INCREDIBLY stable, they are used for geographic locations which experience high rates of earthquakes. Earth bag domes are not only strong, but insulative and can be used for thermal mass.
They do not always have to be built in a dome shape, although this is what gives them their strength as they are geometrically proportionate. If you want an earthbag roof, you need to build a dome so it actually holds itself up with the geometry, otherwise you can build straight walls with buttresses, or curved walls, and use a different material for the roof (such as wooden beams and tin).
If your not much of a person to colour in the lines or your not one to measure lengths of building material exactly then this may interest you! I absolutely love how you can sculpturally build-
Look at these things!
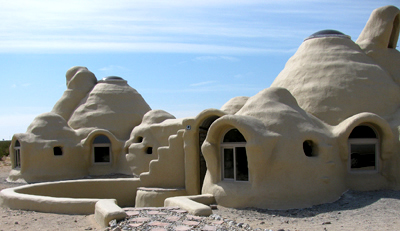
Aren't they beautiful?!
When I discovered that Permastructure (http://www.permastructure.com.au/) were running an intensive workshop for a week near Dayelsford, I couldn't resist. I decided to take a 'business trip' that would help me implement these incredible natural structures in future designs, and to hopefully gain the skills to build my own dwelling one day.
After battling with the mud like a rally car driver, I arrived safe, messy, and sound at my destination.
Fortunately, I got to live in a friends bell tent for a week, which was camping luxury!
After introductions, we learned about how arches and forms work with a practical exercise using wooden forms and bricks:

The base of our structure was already dug out for us, about two bags deep, and filled with scoria. Then a water proof membrane was layed down, with the first earthbag placed on top.
The earth bags are grain bags, which you can purchase in rolls and cut to the size needed. Often, earth bags are filled with wet sand, which when tamped, turns rock hard. The sand mix can also be stabilized with cement if needed.
We were being resourceful and using what we had on site, which was a mixture of mostly clay and sometimes sand, sometimes cement to stabilize some of the rows.
Laying the waterproof layer:

Rolling the bag out and cutting to size:
We would do this by someone walking around the base of the structure and counting how many of their feet, then walking it out on top of the bag. I love this, much better than a measuring tape for me!


Here is a diagram to help you understand.
They are both chains with a metal loop attached to one of the chains as your marker. Once set, the height (purple) marker never changes. The circular compass (green) has a long chain and the marker changes according to the height compass. GEOMETRY!
Here is what the circle compass is attached to so it can swing around easily. You use this to make sure your earthbag is being layed all the way around in a perfect circle.

Now, using the compass, the earth bags are layered over one another: filled, layed, compassed, tamped... filled, layed, compassed, tamped... etc.!
The forms are put in for the door and windows (when it comes to the time) :


Short bags need to be laid around the window form, with the circular bags meeting each time, moving from the door form to the window form. Then one circular bag is placed around and on top of the window form making at a level height.

The archway of the dome is laid on top of the buttresses and forms.


And finally.... the rendering! This is my favourite part, getting my hands dirty, sculpting a house like a beautiful clay teapot!
The render was a mix of lime, sand and cement.
Although we didn't use it for this dome, my favourite render that I saw was lime being soaked in water for a matter of months, which makes this beautiful white cream that you can use like cake icing!
This is anti-septic and anti-fungal as well, protecting your house from critters!
Thank you to Permastructure for such a unique and lovely experience! All the people were friendly and passionate, adding to my ever growing network of Earth Warriors!


Hi
ReplyDeleteNice post.it will be very interesting and informative to us.we have a news about real estate information.Santa Barbara Green Construction
Hey,
ReplyDeleteGreat work .don't worry your work is great and you thinking is great.You can join our
Community of graphic designers to showing your best inside the community for their best future. This is good way for you.
This comment has been removed by the author.
ReplyDeleteWow nice and post and good infromation. Thanku share this post
ReplyDeletetamper proof bags manufacturers in gurgaon
Dabbl is a best Bathroom Shower Company in production of shower enclosures, shower door, shower cubicles, shower trays, shower screen, shower stalls, shower cabinets and many products contact at export4@dabbl.de more information visit here Shower Enclosures, Shower Door, Shower Cubicle, Shower Screen
ReplyDelete